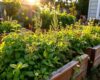

How to Grow Black Cohosh from Seed: Step-By-Step Guide!
Looking to add some herbal flair to your garden? How about growing Black Cohosh from seed? Not only is it a beautiful addition, but it also has a range of health benefits.
In this article, we’ll show you how to grow Black Cohosh from seed and uncover its many uses. Get ready to cultivate something special!
Table of Contents
- 1 The Benefits of Growing Black Cohosh from Seed
- 2 How to Grow Black Cohosh from Seed
- 2.1 Gardening Tools Needed
- 2.2 1. Selecting the Right Soil for Planting
- 2.3 2. Preparing the Soil for Planting
- 2.4 3. Planting the Seeds
- 2.5 4. Watering the Seeds
- 2.6 5. Monitoring and Maintaining the Seeds
- 2.7 6. Transplanting the Seedlings
- 2.8 7. Feeding and Fertilizing the Seedlings
- 2.9 8. How to Water and Maintain the Black Cohosh Plants
- 2.10 9. When to Harvest the Black Cohosh
- 2.11 10. How to Store the Black Cohosh
- 2.12 11. Tips and Tricks for Growing Black Cohosh
- 3 12. Conclusion
- 4 FAQs About Growing Black Cohosh from Seed
- 4.1 When is the best time to plant black cohosh seeds?
- 4.2 How should black cohosh seeds be planted?
- 4.3 How long does it take for black cohosh seeds to germinate?
- 4.4 How should black cohosh seedlings be cared for?
- 4.5 When can black cohosh seedlings be transplanted?
- 4.6 How should black cohosh plants be pruned?
- 4.7 How much sunlight do black cohosh plants need?
- 4.8 How long does it take for black cohosh plants to mature?
- 5 Author
The Benefits of Growing Black Cohosh from Seed
Growing your own black cohosh from seed can be a rewarding and beneficial experience. Not only does it allow you to save money on purchasing store-bought products, but it also gives you the opportunity to know exactly what you’re putting into your body.
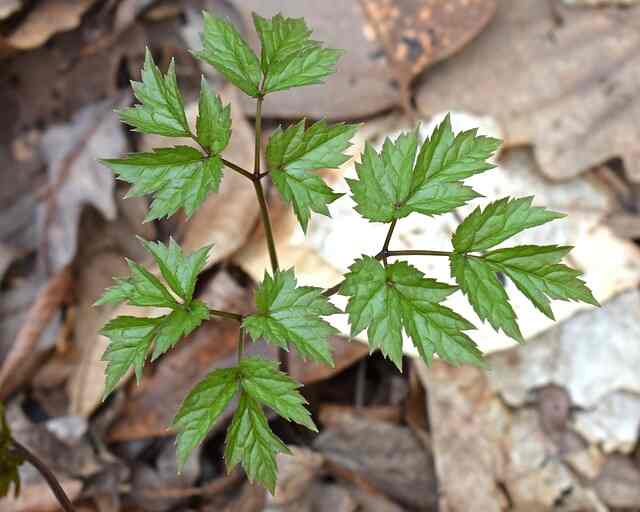
Black cohosh is a perennial herb with many medicinal properties, and by growing it yourself, you can ensure you have a steady supply of this beneficial plant.
Growing black cohosh from seed is easy, and with a few simple steps, you can have your own plants thriving in no time.
How to Grow Black Cohosh from Seed
Gardening Tools Needed
In order to start growing Black Cohosh from seed, there are a few essential tools you will need. To begin, you will need to obtain Black Cohosh seeds, which can be purchased online or at your local garden center. Additionally, the following tools will be necessary:
- Seed starting tray or small pots
- High-quality potting soil
- Fertilizer specifically formulated for Black Cohosh
- Mulch
- Watering can or misting hose nozzle
- Gloves for harvesting
Once you have these tools, you can follow the step-by-step guide to successfully grow Black Cohosh from seed.
1. Selecting the Right Soil for Planting
When it comes to growing black cohosh from seed, the first step is selecting the right soil for planting. You’ll want to choose a soil that is well-draining and nutrient-rich, such as a mix of peat moss and compost.
Be sure to mix in some sand to help with drainage and aeration. If you’re unsure of the soil in your area, you can always test it to find out what nutrients are present.
Once you’ve selected the right soil for planting, you’ll be ready to move on to the next step.
Table: Soil Selection
| Soil Type | Characteristics |
|---|---|
| Well-draining soil | Allows water to pass through quickly to prevent waterlogging |
| Nutrient-rich soil | Provides essential nutrients for plant growth |
| Peat moss and compost mix | Ideal soil mixture for black cohosh |
| Sand | Helps with drainage and aeration |
2. Preparing the Soil for Planting
After selecting the right soil for planting, it’s time to get it ready for the seeds. Preparing the soil for planting black cohosh seeds is an important step that will ensure that your plants have the best chance of thriving.
To begin, make sure the soil you are using is well-draining and has a pH level between 5.5 and 7.5. To test the soil’s pH level, use a soil testing kit. If the soil’s pH level is too high or too low, you will need to adjust it by adding either lime or sulfur.
You may also need to add some organic matter, such as compost or manure. After the soil has been tested and adjusted, work it into the ground with a shovel or a tiller, breaking up any large clumps and removing any rocks or debris.
Finally, rake the soil to make sure it is even and ready for planting.
Table: Soil Preparation
| Steps | Description |
|---|---|
| Soil testing | Determine the pH level of the soil |
| pH adjustment | Add lime or sulfur to adjust the pH level of the soil |
| Adding organic matter | Add compost or manure to the soil to enrich it |
| Soil tillage | Break up any large clumps and remove rocks or debris |
| Soil leveling | Rake the soil to make it even and ready for planting |
3. Planting the Seeds
Planting the seeds for your Black Cohosh plants is the most exciting part of the process! Once you have your soil prepared and ready to go, it’s time to get your hands dirty. Start by creating a shallow hole in the soil, about 1/4 inch deep and 1/2 inch apart from each other.
Drop one or two Black Cohosh seeds into the hole and cover them up with soil. Make sure the seeds are completely covered and that the soil is lightly packed down.
Once you have planted all of your seeds, you can water the area to help them settle into the soil and begin the germination process.
Table: Seed Planting
| Steps | Description |
|---|---|
| Seed hole creation | Create a shallow hole in the soil |
| Seed placement | Drop 1 or 2 Black Cohosh seeds into the hole |
| Soil covering | Cover the seeds completely with soil |
| Soil packing | Lightly pack down the soil |
| Watering | Water the area to help seeds settle and germinate |
4. Watering the Seeds
Maintaining soil moisture at an appropriate level, without making it waterlogged or soggy, is crucial. This can be achieved by watering the soil until it is damp, but not soaked. Make sure to avoid puddles of water, as this can cause the seeds to rot.
An easy way to monitor the moisture of the soil is to stick your finger a few inches down into the soil and feel for dampness. Time to water again if the soil is dry.
Once the seeds are planted, it is important to keep the soil damp for about two weeks to ensure the proper germination of the seeds.
Table: Watering
| Steps | Description |
|---|---|
| Soil moisture | Maintain soil moisture at an appropriate level |
| Watering frequency | Water when soil is dry, but avoid waterlogging |
| Moisture monitoring | Check soil moisture by feeling for dampness |
| Rot prevention | Avoid puddles of water that can cause seeds to rot |
5. Monitoring and Maintaining the Seeds
Once you’ve planted your black cohosh seeds, the next step is to monitor and maintain them. You’ll want to make sure that the soil is kept moist, but not overly wet. If the soil is too wet, the seeds can rot, so be sure to check the soil daily to make sure it doesn’t get too wet. It’s important to keep the soil moist, but not soggy.
You can also make sure to cover the area with mulch to help prevent weeds from growing. Additionally, if you have any weeds that do grow, be sure to remove them, so they don’t compete with your black cohosh plants.
Once the seeds have germinated, you’ll want to thin out the seedlings to leave only the strongest plants. This will help them to get the nutrients and light they need to grow. Finally, you’ll want to keep an eye out for any pests or diseases that may affect your black cohosh plants.
If you see any signs of pests or disease, make sure to take action as quickly as possible to avoid any further damage.
Table: Monitoring and Maintenance
| Steps | Description |
|---|---|
| Soil moisture | Keep soil moist, but not overly wet |
| Weed prevention | Cover the area with mulch to prevent weed growth |
| Weed removal | Remove any weeds that do grow to prevent competition with black cohosh |
| Seedling thinning | Thin out seedlings to leave only the strongest plants |
| Pest and disease prevention | Keep an eye out for pests and diseases and take action quickly to prevent damage |
6. Transplanting the Seedlings
Step Six in growing Black Cohosh from seed is transplanting the seedlings. This is an important step in the process of growing this herb, as it will ensure that the seedlings have the best chance at success. Once the seedlings reach a height of 3–4 inches, they are ready to be transplanted.
To do this, gently remove the seedlings from the soil and place them in individual containers filled with fresh soil, taking care to not disturb the roots. Make sure that the containers are deep enough to accommodate the root systems of the seedlings.
Once the seedlings are in their new containers, add a layer of mulch or compost to the surface of the soil. This will help to keep the soil moist and help the seedlings to establish themselves in their new environment.
Water the seedlings thoroughly and keep them in a warm, sunny spot, and the seedlings should start to thrive.
Table: Seedling Transplanting
| Steps | Description |
|---|---|
| Seedling height | Transplant seedlings when they reach 3-4 inches in height |
| Container selection | Choose individual containers that are deep enough to accommodate the root systems |
| Soil filling | Fill containers with fresh soil |
| Mulching | Add a layer of mulch or compost to the surface of the soil |
| Watering | Water the seedlings thoroughly |
7. Feeding and Fertilizing the Seedlings
Once your seeds have been transplanted, you’ll want to ensure your Black Cohosh seedlings get the nutrients they need to thrive. Step seven in growing Black Cohosh from seed is feeding and fertilizing the seedlings. This step is key to helping your seedlings reach their full potential.
When it comes to fertilizing, you’ll want to use a slow-release fertilizer that is specifically formulated for Black Cohosh. These fertilizers are available at most garden centers and online, so they’re easy to find. When applying the fertilizer, be sure to follow the instructions on the packaging.
In addition to fertilizing your Black Cohosh seedlings, you’ll want to make sure they also get enough water. Aim to water your seedlings at least once a week to keep the soil moist, but not soaked.
By following these steps, you can ensure your Black Cohosh seedlings get the nutrients and water they need to thrive. With the right care, your seedlings will soon be ready to harvest.
Table: Feeding and Fertilizing
| Steps | Description |
|---|---|
| Feeding schedule | Feed the seedlings every two weeks |
| Fertilizer type | Use a balanced, slow-release fertilizer |
| Fertilizer application | Apply the fertilizer according to package instructions |
| Soil moisture | Water the seedlings thoroughly after fertilizing |
8. How to Water and Maintain the Black Cohosh Plants
Watering and maintaining your Black Cohosh plants is essential for ensuring healthy growth and a successful harvest. As a general rule of thumb, the soil should be kept slightly damp but not wet. That means that you should water your plants regularly but avoid overwatering them.
You should also ensure that the soil drains well to avoid water-logging. Additionally, it’s important to add a layer of mulch around your plants to protect them from extreme temperatures and moisture loss.
Fertilizing your plants can also help to ensure that they’re getting the nutrients they need to thrive. When fertilizing, use a slow release fertilizer that’s specifically formulated for Black Cohosh plants.
Finally, make sure to monitor your plants for signs of disease or pests and take the necessary steps to prevent any infestations.
Table: Watering and Maintenance
| Aspects to consider | Recommendations |
|---|---|
| Soil moisture | Keep soil slightly damp but not wet, avoid overwatering. |
| Drainage | Ensure soil drains well to avoid water-logging. |
| Mulching | Add a layer of mulch around plants to protect from temperature and moisture loss. |
| Fertilizing | Use slow release fertilizer formulated for Black Cohosh plants. |
| Pest and disease control | Monitor plants and take necessary steps to prevent infestations. |
9. When to Harvest the Black Cohosh
Harvesting your black cohosh plants is an important part of the process. You can harvest your plants when the flowers are in full bloom and the seedpods are just beginning to dry out. When you see the seedpods turning brown, it is time to harvest.
Make sure you use gloves when harvesting, as the leaves and stems are quite sharp. Be sure to cut off only the seedpods, as the leaves and stems can be left in the ground for future growth.
Once you have harvested the seedpods, you can then dry them in a warm, well-ventilated area. After they are fully dried, you can store them in an airtight container for later use.
Table: Harvesting
| Aspects to consider | Recommendations |
|---|---|
| Harvesting time | Harvest when flowers are in full bloom and seedpods are just beginning to dry out. |
| Harvesting method | Use gloves when harvesting and cut off only the seedpods. |
| Leftovers | Leave leaves and stems in the ground for future growth. |
| Drying | Dry in a warm, well-ventilated area and store in airtight container. |
10. How to Store the Black Cohosh
Storing your Black Cohosh harvest is an important step in the growing process. Once you’ve harvested the Black Cohosh, you’ll need to store it properly in order to ensure it remains fresh and full of nutrients.
The best way to store Black Cohosh is to hang it in bunches in a cool, dry, dark place with good air circulation. This will help the herb retain its flavor and medicinal properties. You can also put the herb in a paper bag and store it in the refrigerator, where it will stay fresh for up to two weeks.
If you want to store the herb for longer, you can dry it and store it in an airtight container in a cool, dark place. Dried Black Cohosh can last up to a year when stored properly.
Table: Storing
| Aspects to consider | Recommendations |
|---|---|
| Storage method | Hang in bunches in cool, dry, dark place with good air circulation. |
| Refrigerator | Put herb in paper bag and store in refrigerator, will stay fresh up to 2 weeks. |
| Drying | Dry and store in airtight container in cool, dark place, can last up to a year. |
11. Tips and Tricks for Growing Black Cohosh
Growing black cohosh can be a rewarding experience, but it does require some effort and knowledge. Here are some tips and tricks to help you get the best results when growing black cohosh from seed.
First, make sure to select a soil that drains well and is rich in organic matter. You can also add compost or manure to the soil to help enrich it. Next, make sure to keep your seeds moist. Watering your seeds regularly will help them to germinate and grow.
Once your seeds have grown into seedlings, it’s important to keep them well-fed and fertilized. A balanced, slow-release fertilizer is a great choice for black cohosh plants. To keep your plants healthy, water them deeply but infrequently.
Finally, it’s important to harvest your black cohosh at the right time. When the flowers and leaves start to turn brown, it’s time to harvest. Once you’ve harvested your black cohosh, make sure to store it in a cool, dark place.
With these tips and tricks, you’ll be sure to get the best results when growing black cohosh from seed.
Table: Tips and Tricks
| Aspects to consider | Recommendations |
|---|---|
| Soil selection | Select soil that drains well and is rich in organic matter. |
| Soil enrichment | Add compost or manure to the soil to help enrich it. |
| Watering seeds | Water seeds regularly to help them germinate and grow. |
| Feeding seedlings | Use balanced, slow-release fertilizer to feed seedlings. |
| Watering seedlings | Water deeply but infrequently to keep plants healthy. |
| Harvesting | Harvest black cohosh when flowers and leaves start to turn brown. |
| Storage | Store black cohosh in a cool, dark place after harvesting. |
12. Conclusion
Growing your own Black Cohosh from seed is a great way to enjoy the many health benefits of this herb. Not only does it provide you with a nourishing and delicious herbal tea, it also holds many medicinal properties.
Even if you don’t have a lot of gardening experience, it’s much easier than you think to grow Black Cohosh from seed. By following the easy steps outlined in this article, you’ll be able to produce your own healthy supply of Black Cohosh in no time.
With the right soil, adequate watering, and regular monitoring, you can enjoy the many benefits of growing your own Black Cohosh at home.
FAQs About Growing Black Cohosh from Seed
When is the best time to plant black cohosh seeds?
Black cohosh seeds should be planted in the fall, ideally in September or October. This allows the seeds to experience a period of cold stratification, which is necessary for successful germination.
How should black cohosh seeds be planted?
Black cohosh seeds should be planted in a well-draining soil mixture, about 1/4 inch deep. Water the soil thoroughly and cover with a clear plastic bag or dome to maintain moisture and humidity.
How long does it take for black cohosh seeds to germinate?
Black cohosh seeds can take anywhere from 1 to 3 months to germinate, depending on the conditions. Keep the soil moist and at a consistent temperature of around 70 °F to encourage germination.
How should black cohosh seedlings be cared for?
Once the seedlings have emerged, remove the plastic cover and place them in a bright, but not direct, light. Maintain soil moisture and fertilize with a balanced fertilizer every 2–3 weeks.
When can black cohosh seedlings be transplanted?
Black cohosh seedlings can be transplanted into larger pots or into the garden once they have grown to about 3–4 inches tall. Make sure to transplant them in a shady spot with rich, well-draining soil.
How should black cohosh plants be pruned?
Black cohosh plants don’t require much pruning, but deadheading spent flowers can encourage more blooms. In the fall, cut back the stems to the ground to prepare for winter.
How much sunlight do black cohosh plants need?
Black cohosh plants prefer partial to full shade, making them a great addition to woodland gardens or areas with dappled sunlight. Excessive direct sunlight can lead to leaf scorching.
How long does it take for black cohosh plants to mature?
Black cohosh plants can take 3–5 years to mature and produce flowers. Be patient and provide them with the right growing conditions, including rich, well-draining soil and consistent moisture.
Related Post: 9 Best Potting Soil For Growing Herbs – Indoors And Outdoors